Beginning Crochet - gauge, finishing off, weaving in ends and blocking

We covered a number of items are last class: the importance of making a gauge, finishing off a project, weaving in ends and blocking.
First off was working a gauge. A gauge is a small swatch of work, typically made up of a small piece of the pattern or a stitch that is used in the pattern. The purpose of making a gauge is to ensure that the tension and size of your stitches match the designer’s. This way your finished item will be the same size as the size indicated in the pattern.
How do you make a gauge swatch?In all of my patterns, there are pattern instructions for you to follow to make your gauge. Some patterns will tell you to repeat certain rows in the pattern. After creating your gauge swatch, be sure that the finished size is the same as dimensions indicated for the gauge. If you find that your swatch is too big or too small, try using a smaller or bigger sized hook.
Is gauge really important?Sometimes. Depending on what you’re making, you might not care if your work turns out the proper size. I don’t care if my refrigerator magnet turns out a little too big, but if I’m making a sweater, it better fit me. It’s up to you to determine when you think it’s important, but when in doubt make the gauge anyway.
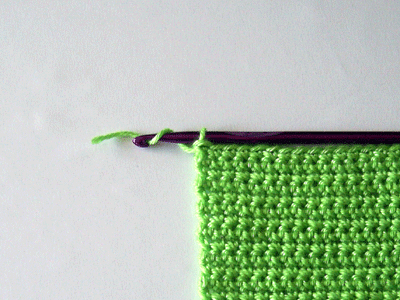
Finishing off a project or binding off. Once you have finished your last stitch in your pattern you will bind off the yarn by first cutting the yarn 6 inches for a tail.(picture 1) Then yarn over and pull the yarn through the last loop. (picture 2) Pull all the yarn all the way through and tighten. (picture 3)


Weaving in your ends. Once you have finished your project you are ready to weaving in the ends of your yarn. I suggest leaving at least 6 inches of yarn at the end. Take your tapestry needle and weave your yarn into your stitches. I suggest doing this in a "S" formation. This will help secure your yarn from coming unraveled.
Blocking.
What a great sense of accomplishment there is when a crochet project is finally completed! Though a relatively simple technique, blocking is what gives many projects a polished appearance. The process shapes and sets the design and smooths the stitches into place. Here are some handy tips we've learned over the years about blocking:
First: You should always , and a blocking board, which is a padded board made specifically for this technique. If you prefer, you can substitute a table, a bed, a carpeted floor, or check the yarn label for any special care instructions. Lots of natural fibers, such as cotton, linen, and wool respond well to steam blocking. However, you shouldn't use steam or heat on mohair or angora. There are also many acrylics and some blends that shouldn't be blocked at all, especially with steam, because they might melt! If you're still unsure about how to block your project, try blocking a gauge swatch first to see what the result will be.
Second: You'll need rust-proof pins, fluffy towels, any flat surface that you have padded adequately. Be sure to protect these surfaces from moisture with a layer of plastic bags or towels.
Now you're ready to choose your blocking method. There are three ways of blocking: cold blocking, wet blocking, and blocking with steam.
Cold Blocking is best for those fragile acrylics mentioned earlier. Shape your item on the board, holding it down with rust-proof pins, which are a must for any type of blocking. Cover your item with dampened bath towels, and when the towels are dry the project is blocked.
Wet Blocking works best on projects made with thread, such as doilies, coasters, or place mats. If the item is hand washable, use a mild soap or detergent and rinse it without wringing or twisting. Rolling the project in a succession of dry towels helps to absorb the excess moisture. After laying your project on a flat surface, gently smooth it into shape and pin it down. When it's dry, it's blocked.
Steam Blocking is great for lots of crochet projects, especially wool or wool blends, but be cautious not to steam items that can be damaged by heat. Start by turning the item inside out and then use rust-proof pins to shape it on a flat surface. Holding a steam iron or steamer just above your project, steam the piece thoroughly. Take care not to touch the iron to your crochet because this can flatten the stitches or scorch the yarn. Finally, leave the item in place until it's dry.
With these blocking techniques in mind, you're ready to give your crocheted projects a big finish!


Comments